FAQ > Automation |
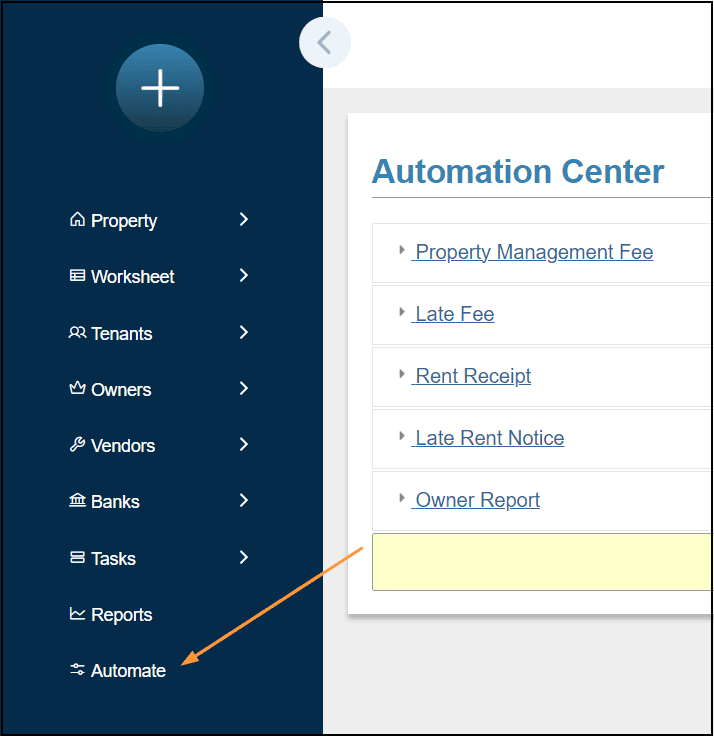
1. How does Simplifyem.com create Automatic PM fees for you?A property management fee is the fee the PM is collecting for each property based on rent collections. Automatic PM fee enables a PM User to enable/disable the automatic addition of the PM fee. PM User can define the formula for the calculation by specifying the percentage of the rent income. User can optionally add a minimum dollar amount to be charged. Steps to create Automatic PM fee: 1.Here I have a tenant Jane with an active lease, rent $100,due date: 1st. To create late fee: Click on ‘Automate’ on the left side of the page.
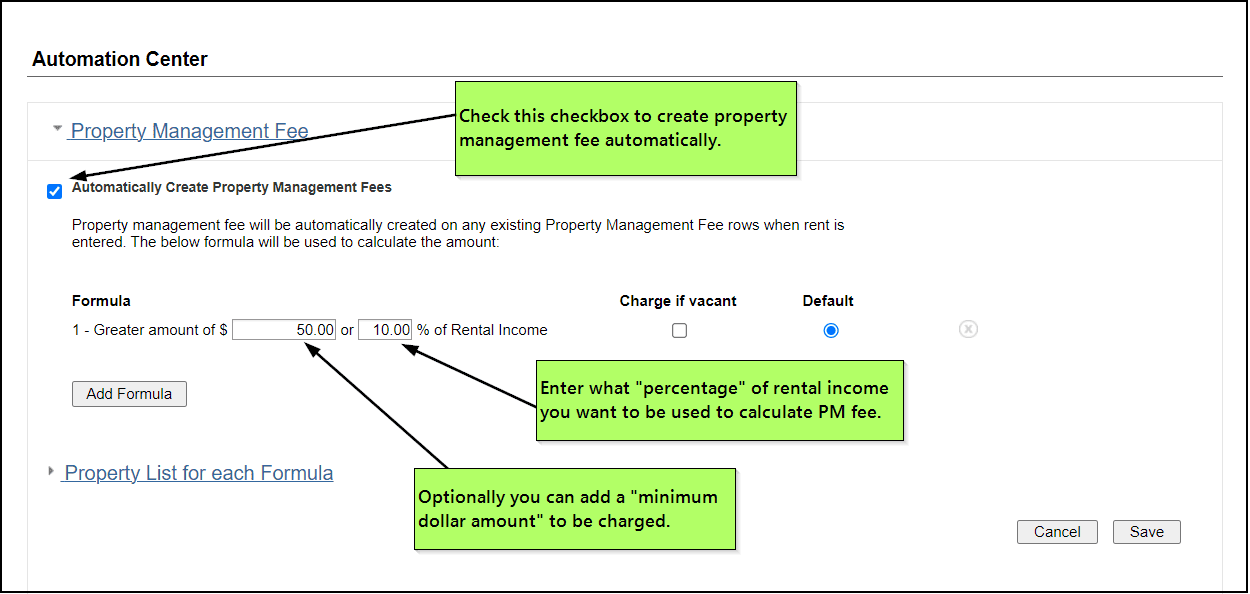
2.This will take you to ‘Automation Center’ page. a.Here check ‘Automatically Create Property Management Fees’ Checkbox b.Define PM fee formula: Enter what “percentage” of rental income you want to be used to calculate PM fee. Optionally you can add a “minimum dollar amount” to be charged.
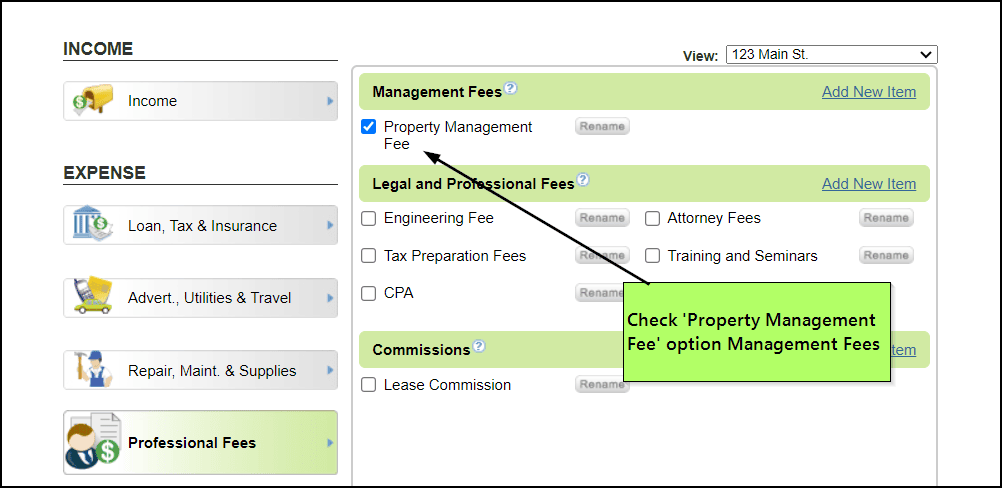
Ex: SamPM defines PM fee as 10% of the rent income with minimum $50. c.There is option to activate “Charge if vacant” (checkbox). If “Charge if vacant” is checked and there is a minimum amount set, the PM fee will be automatically added when tenant is late (rent income = $0 for that month). Instead, if I check “Charge if vacant” and Jane does not pay rent for Current month(July). Next month 1st (Aug 1st) $50 min Late fee will be added. Here I have left ‘Charge if vacant’ unchecked. 3.Click Save. 4.Goto Customize Worksheet and check mark ‘Property Mangement Fee’ under Professional Fees.
5.Goto Property Worksheet. For Jane,I enter $100 rent for current month(Aug). $50 PM fee gets added (Since $50 is greater than 10% of $100)
Note: After the PM formula is activated PM Fee will only be created for new rent collection and not for the ones entered prior. |
2. How does Simplifyem.com create Automatic Late fees for you?Users have the ability to set the automatic generation of late fee due for his tenants from the automation center. You just have to set the date of the month you want the late fees to be created for you for all the late tenants that month. Steps to create Automatic Late fee: 1.Here I have a tenant John with an active lease, rent $1000,due date: 1st, daily late fee $1, maximum late fee $20. Today is Aug 15th. As of today tenant John is late for his August rent. 2.Click on ‘Automate’ on the top of the page.
3.This will take you to ‘Automation Center’ page. Click on ‘Late Fee’ link. a.Check ‘Automatically Create Late Fee’ checkbox. b.Select the date of month the late fee calculation should be made. Here I selected 16th. c.Click Save button.
4.On 16th August, if tenant John has still not paid the rent Late fee of $16 will be added. Note: The late fee is created only 1.If the tenant is late for Rent on the date the automation rule for late fee is run. (Here, if tenant John is late for rent on Aug 16th , Late fee will be added) 2.And late fee is created only for the current month. (So, if tenant John was late for both July and Aug, only late fee for Aug will be created on August 16th.) |
3. How can you Automate sending of Rent Receipt?Users have the ability to automatically email/publish Rent Receipt from Automation center. You just have to set the day of the month from the automation center. The automation will run every month at the day of month specified,starting the following month. Steps to automate sending of Rent Receipt: 1.Here I have 2 tenants with active leases: a)John (email: John@abc.com), fixed term,rent $1000,due date: 1st. b)Sam (email: Sam@abc.com), fixed term,rent $2000,due date: 1st. (For Sam tenant portal has been Setup.) 2. Click on ‘Automate’ on the top of the page.
3.This will take you to ‘Automation Center’ page. Click on ‘Rent Receipt’ link. a.Check ‘Automatically Send Rent Receipt Emails’ checkbox. b.Select the Day of month the Rent Receipt should be emailed/published. Here I selected 7th.(Today is July 2nd) c.Click Save button.
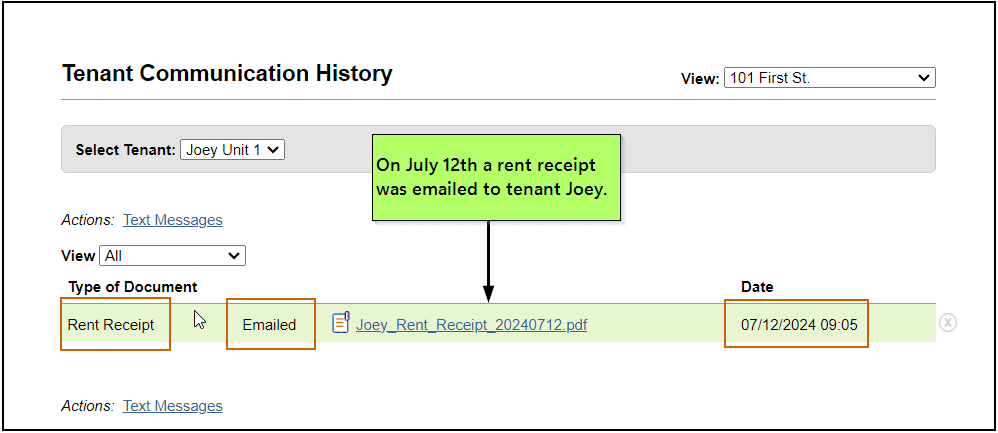
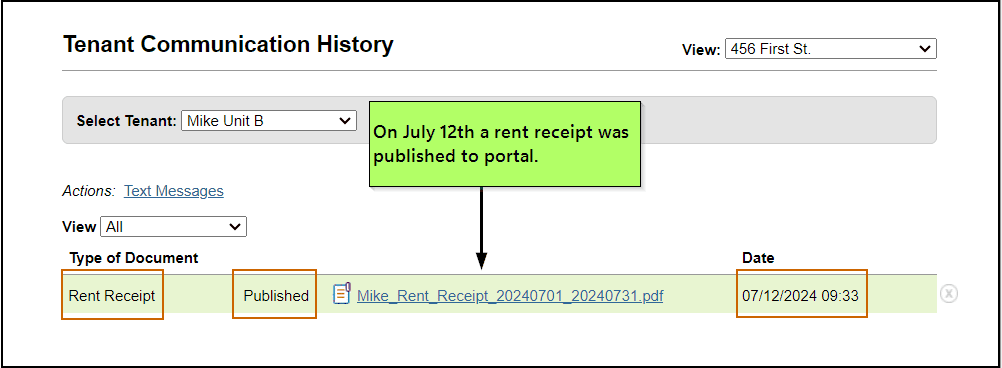
4.On July 12th, a)for tenant Joey Rent Receipt will be emailed. b)for tenant Mike Rent Receipt will be published. The same can be seen in Tenant Communication History page.
Note: 1)The Rent Receipt automation rule is simple : the automation system generates the Rent Receipt just as if the PM clicked on the button in the ‘Generate Rent Receipt page’ on the day specified. 2)The date range used for the generation of the receipt will be from Beginning of Month to End of Month, where the Month is the month the automation is ran. |

